
At Train for Life, our mission is to inspire you to move well, be strong and enjoy life. That being said, a major aspect of your time at Train for Life will revolve around body maintenance. Like a car needs a tune up, bodywork, and an oil change, our bodies work very similarly. We need to make sure we are getting into the “shop”, even more so then a car would, in order to finally accomplish that final piece of our mission, enjoying life
Have you ever noticed your neck, shoulders, knees, hips and/or ankles becoming tight and restricted before, during, or after a training session? Well, there is no doubt your not alone on this one, but don’t get intimidated yet, there may be a cure! DOMS, or delayed-onset muscle soreness is the arch nemesis of all frequent exercisers. To combat this syndrome, foam rolling and a proper protein-packed diet will help you along the road to a speedy recovery. Gray Cook, the creator of the Joint-by-Joint approach and a mecca in the field of exercise science once said, “Don’t place fitness on top of dysfunction.” This quote right here is a big reason why we regress some of our members in the middle of a training session. We never want to make matters worse, so taking that step back is crucial when trying to make ourselves BETTER!
Ingredients for success-
1 foam-roller
1 lacrosse ball (tennis ball or racquetball can be used as well)
Let’s keep things organized and work from top to bottom, addressing all those common issues along the way. Each section of the body will be addressed by answering why we should roll this section of the body, as well as showing you how to foam roll the area.

Neck (cervical spine)
Why – Headaches? Sore from sitting? Sure, it happens to everyone. Those trigger points that were mentioned earlier could be the underlying cause of many of our tension headaches.
How To - If you have been training for a long time grab a lacrosse ball, if you haven’t been to the gym in a long time/ever, grab something softer, like a racquetball or tennis ball. Lie on the ground or stand parallel to a wall, placing the ball on the upper trapezius, and begin to move around. You will start to notice some areas are super sensitive, hello trigger points! If you find one, lay or stay on the spot for a few seconds and take 5 deeper diaphragmatic breaths. You can feel the tension dissipate almost instantly. Continue to roll the ball on the other side of the trap, and eventually along the back of the neck where it meets the bottom of the head. If using a ball was difficult for you, a small foam roller could be used. The roller is too big for an area like this, so using a ball is preferred.
Shoulder Complex and Rotators

Why –Through any form of upper body exercise, your shoulders and shoulder rotators become tight and sometimes even lose range of motion. Now, exercise should never be completed without a proper roll or stretch before and after the session, but sometimes you need a bit more. Limiting factors, like impingement and poorly treated muscle tissue, are the underlying reason why your shoulders lack range of motion and flexibility.


How To - Let's work from front to back, starting with the chest. Stand adjacent to a wall, while placing a lacrosse ball underneath the clavicle. Begin to work the ball side to side and up to where the front the shoulder begins. Make sure to roll that ball around on the really sensitive areas. The discomfort should begin to subside, you may need 2-4 minutes per spot. Also, roll with the ball with your arm locked out over head, out to the side, and down to get all angles of the different muscle fibers that attach at the shoulder. Next, lie on the ground with the ball just to the side of the armpit. Again, raise and lower the arm to get those 'sticky' areas of the shoulder. Lean and roll onto the ball to search for trigger points, or the sensitive areas.
Lats (Lattismus Dorsi)
Why – Lats are huge muscles. They make up most of the space on your back, and are responsible for pulling things toward yourself. Like any major muscle we want to make sure it is working optimally.
How-to- Place the roller on the floor and lie on it. Your may want to put the roller on an angle to get a better roll. Raise the arm up, and make a thumbs-up (your thumb should be pointing to the floor beneath you). Doing so will open up the rotator cuff and loosen up the tissues that may be causing poor overhead range of motion as well. Using your legs, begin to push and pull your body along the roller, while maintaining that overhead arm position. Make sure to breathe through your nose, into the belly, and out through the mouth.
Upper Back (T-spine), Lower back (lumbar spine), and Hips

Why- As a human population are plagued by low back pain because we neglect to treat it they way it was meant to be treated. The lumbar area becomes injured because of the compensation that’s caused by poor hip and thoracic spine mobility. Also, people have always thought sit-ups and crunches are the best thing to do for your abs…WRONG, and on many different levels. Flexion of the core is ultimately flexion of the lumbar spine. Any sort of flexion or extension of the lumbar spine goes against the joint-by-joint approach. This will begin to cause bulged discs and pinched nerves. Stuart McGill, a spine specialist from the University of Waterloo in Canada, recommends exercises that promote a stiff lower back and a mobile upper back, like planks and pot-stirrers. So, how do we fix the issues we’ve created over time? Focus your time and effort on becoming more mobile in the hips and upper back, eventually the lower back should be functioning as it was intended to be, but there will always be cases where lower back pain is caused differently. As for rolling the area, it may help acutely, but if the origin of the issue isn’t addressed the pain will continue.

How-to – Upper Back - Place the foam roller on the floor and lie with it underneath the shoulder blades. Move the roller up and down by pushing and pull yourself with your legs. You can perform an upper back extension by leaving the roller just under the scapulae and arching the upper back while maintaining a stiff and straight neck. You should feel a stretch. To further your self-massage, try hugging yourself with your arms and repeating the pushing and pulling motions.

How-to - Hips – To roll out the glutes place the roller on the ground and sit on it. Cross one leg over the other while keeping the glute of the crossed leg on the roller (the leg that is straight should push and pull you). Lean to the side of the hip and find the sensitive areas. Crossing the leg should help someone with poor hip mobility.

Another area associated with poor hip mobility would be the hip flexors. Lie on the foam roller face down; keep the roller level with the hips. Pulling and pushing with your arms, slowly roll over the foam roller. Also, leaning to one hip for 10-12 passes and switching may help you put more pressure on the flexors.
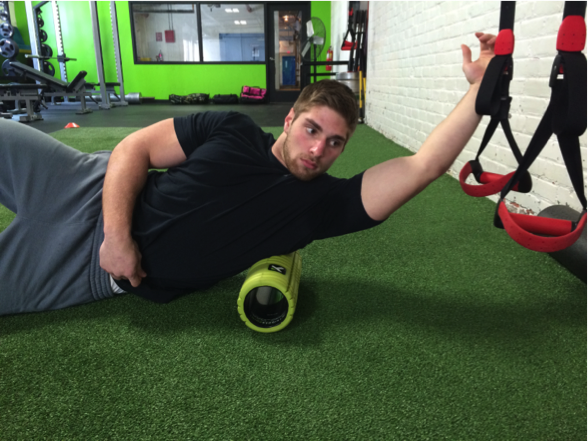
Now for the TFL (Tensor Fasciae Latae) and IT band (iliotibial band). These body parts are an infamous causers of hip immobility and being a painful area to roll. Place a roller on the ground and lie on your side with the roller underneath one hip. Pulling and pushing with the arms, slowly roll and pause on any sensitive areas.

Thighs (Adductors, Quadriceps, and Hamstrings)
Why – Pushing a sled, running, squatting, dead lifting, and many other exercises can be pretty harsh on your thigh muscles. Both the hamstrings and the quadriceps are large muscles, responsible for both extending and flexing the knee. Loading this motion with resistance can cause some muscle soreness.

How-to – Quadriceps – to roll the quads, place the roller on the ground and lay with it under the hip flexors. Lean to one leg and begin the pushing and pulling motion with your arms. Try to roll slowly over the entire thigh.
How-to -Hamstrings (Biceps Femoris) – place the roller or lacrosse ball on the ground, and put your thighs on top of the object. From the bottom of the glute, to the top of the knee, being to roll with a slight lean toward one leg for more pressure. Make sure you are moving slowly, and pushing and pulling yourself with your hands and/or the other leg.

Calves, Ankles, and Feet
Why – Like the issues we spoke about previous, these areas of the leg are usually the origin of common problems. Running and jumping put a lot of stress on the foot, ankle, and calves. Having tight calves and ankles while you run is painful, and may eventually lead to anterior tibial stress syndrome (a fancy word for shin splints). These issues are easily avoidable by adopting a better shoe choice. Doing so will relieve the leg from the stress caused by a raised heel and soft, unbalanced sole. But for now, let’s roll!

How-to - To focus on the calf muscles place the roller on the belly of the calf and again have the client roll back and forth using their arms to push and pull themselves over the roller. If more pressure is desired, take one leg off and place the foot on the group, leaving one leg on the roller.

NOTE: Make sure you are getting about 8-12 rolls over an area. Also, if you are new to foam rolling and self-massage remember to keep breathing! It’s normal to subconsciously hold your breath because of the discomfort, but DO NOT let it happen! Respiring your muscle and fascia fibers with new oxygen is necessary in order to release the imperfections. It’s okay to feel a brief discomfort while you are rolling out, especially when you’re using the lax ball.
Citations-
Boyle, Michael, and Gray Cook. "THE JOINT-BY-JOINT APPROACH." Gray Cook Movement. N.p., 11 Nov. 2010. Web. 02 Apr. 2015.
All photos of the foam rolling process were taken at Train for Life, in Chicopee, Massachusetts.
Sel